These notes document the class recently taken at MASW, "Applying the Principle of Movement" taught by Christopher White. Just about every aspect of this course was new for me. A tremendous amount of learning with plenty of one-on-one teaching by Chris.
The class began with a few hours of lecture and that was pretty much the last of lecturing for the week. The high points of his instruction are sketched out below, most dealing with how to make the eye purposefully move through your sculpture.
Every object has lines and planes that direct the eye. Movement in sculpture is simulated by using these lines and planes to direct the eye. Some planes are stop signs and most often need to be eliminated from the sculpture. The gist of turning a piece of wood into art is seeing what the wood offers and refining it, often with movement in mind.
Abstract sculptures are simpler than anatomical. There is no need to represent an object, though often objects are suggested by the abstract design as that is how our brains work. Living things are more complex than abstract ideas and require more attention to details, like symmetry.
Chris laid out wood with suggestions on how to utilize the pieces. I selected a large length of twisted juniper accompanied by two small lengths of mesquite, the latter to serve as a base for the juniper. Chris had used the juniper at one time to make a bronze casting. Most of the silicone used to protect the juniper while making the mold had been removed, though some areas still had silicone to be dug out, especially the fine cracks. My knife point was the best tool available at the time, though a dental pick would have been ideal.

Chris and I spent some time determining how best to arrange the three pieces. We made a preliminary decision that allowed me to begin sculpting the juniper. This arrangement of wood was modified as the sculpture took shape, but the orientation of the juniper remained the same.

The juniper sculpting will only make sense with notes from Chris's lecture. The main movements in the juniper were clear, a long twist along the axis we chose as the vertical, beginning with a curve resembling a fist and ending with a twisted plane coming to a point.
Straight lines are minimized in a sculpture that desires to show movement. Curves used in sculpture are "unipagio" sic, parentheses, or the same combined into S-curves. Two S-curves joined at their ends is a fusiform, a more complex fusiform than the usual lemon shape. This complex fusiform can be rotated in three dimensions and twisted in three dimensions as well. These twisted fusiforms are a common feature of my sculpture. This complex fusiform can be easily drawn by holding the pencil or chalk vertical with more than the point touching the paper or chalkboard. Moving the pencil down, to one side and then down, creates the fusiform with narrow points and a wide center.
The photo below, from Pinterest, is a good representation of a twisted fusiform defining an abstract sculpture. Notice that no matter where your eye begins it drifts to the top of the sculpture. The planes and lines of the twisted fusiform direct your eye to the top point. The fusiform's twist insures that there are no straight lines, when observed from any angle.
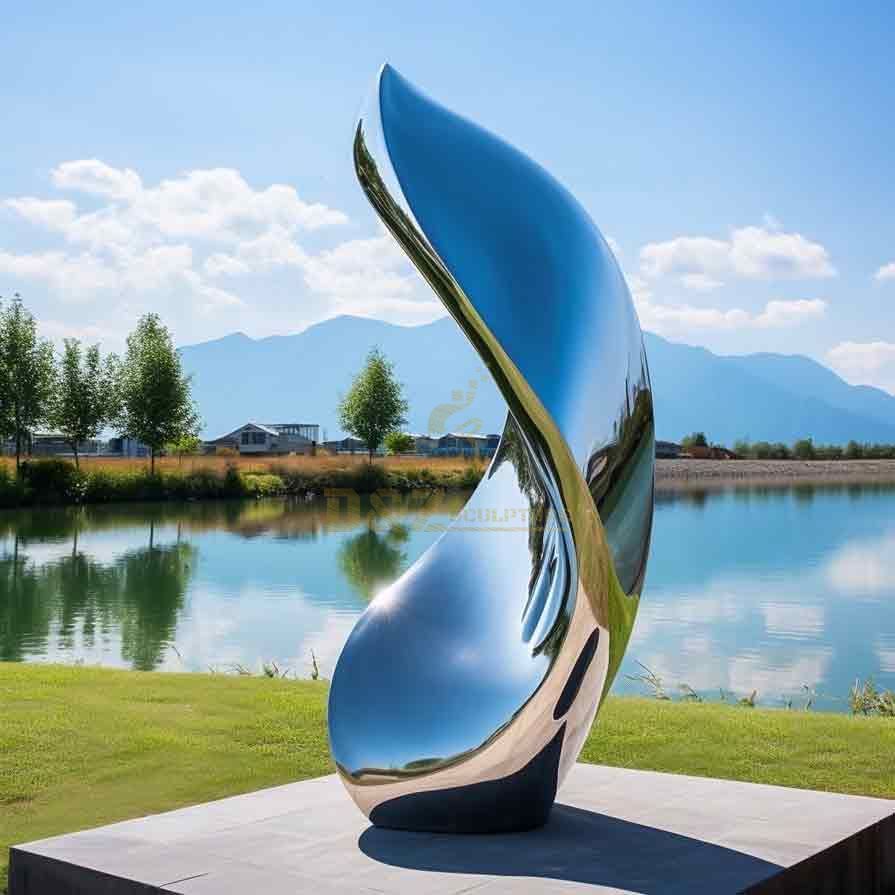
As Chris discussed the abstract, he also related how to create this abstract in the wood. For example, when rotating the plane of a fusiform to achieve a shape similar to that above, the rasp is held at 13° to the axis of the rotation. The up and down motion of the rasp along with a twist automatically creates the desired sweeping curve.
Chris pointed out how negative space can also direct the eye, an important point for my sculpture as I decided to lighten a solid face of the juniper with just such a negative space, a void.
Another common curve used in sculpture is a veloute or 3D spiral, often a spiral whose middle end is pulled up out of the plane. Looking at this spiral from one side tricks the eye into thinking it is made from two or more fusiforms.
Chris concluded the lecture with a list of questions and possible answers. He constantly coached us to ask the following questions of our forming sculptures. The questions refer to each and every line and plane in the piece.
Chris noted that concave plane profiles are used a lot as they can easily be softened to something more lifelike. An emphasis on the result leads to a wood carving, while putting your emphasis on movement produces a wood sculpture.
Chris highlighted the fifth question. Rotation is very important in sculpture. Without rotation lines will have straight profiles. A curved line from one profile shows off its curve, while from an orthogonal profile may be perfectly straight. These hidden straight lines are "fixed" by adding rotation, rotation of the underlying plane.
Two lines can diverge or converge also informing the movement inherent in your sculpture. The questions above, especially the last can often be answered with choices from the following list.
Some important points include: design takes precedence over detail and make it look intentional. For example, if a knot in the wood does not fit with the design then the knot should be hidden so as to not distract from the design. If the knot fits the design then emphasize it.
Some of the more experienced students in the class chose to sculpt animals. Chris shared two important aspects of sculpting animals, pay close attention to symmetry and keep the eyes parallel with the horizon.
Now for my attempt at sculpting. Chalk was used to sketch out desired changes in the juniper. The changes were made with the chisel, rasp and grinding burr. The first photo shows where the end was to be cut getting rid of the abrupt and jagged natural end of the juniper log. The second photo shows in pink where the void was to be opened, a natural depression in the twisted plane. Note the sand bags used to hold the wood during carving, made from the legs of discarded jeans, filled with sand and sealed on both ends with zip ties.


Significantly more wood was removed from this knuckle end of the juniper. The top end was the saw cut that separated this piece of juniper from the dead log recovered in a Texas canyon. This end was refined on multiple occasions during the process.


I only have this photo after opening up the center of the juniper log. The photo does a nice job showing the emerging planes of the opening, both to eventually be shaped into twisted fusiforms. The juniper log from the beginning presented a plane extending and twisting up from the knuckle to the even more highly twisted top. All of my efforts were meant to refine and highlight this natural movement of the wood.

The edges of the top twist were shaped and the top point more clearly defined as shown in the first photo below. The second photo shows the sculpted opening from the back side at this point in the process.


Sculpting turned to some of the planes between the opening and the top twist as seen in the first photo below. The opening has also been further refined. Note the nice point at the top of the void's fusiform which continues to direct the eye further up the sculpture. The bottom point of the fusiform still needs work. The second photo shows the opening from the backside. It also shows how the inside of the upper twist was cleaned out, both silicone and wood were removed.


The next photo shows the Vevor grinding tool purchased for this class. It was not a necessity, but was very useful. It takes some care to use properly and because of the one way rotation of the grinding bit, can only be moved in one direction across the wood or it skips. I did not purchase the more expensive Foredom grinder, as I was not certain at the time how much sculpting I would be doing. Note the nascent sculpture clamped up in the background

The next two photos show the clamped sculpture in more detail. The photos also reveal all of the work that still needs to be done, both in areas yet to be touched as well as refinements to the previously sculpted areas. Many of the planes are a little wonky and not smooth twisting surfaces. Need to get rid of that platypus nose!


During the process many different things were tackled over a period of time. One plane would be refined and that would lead to refinements to a related plane, etcetera. The photo below shows the first work on the top, relieving it of some wood and making the natural grooves more apparent and all orienting toward the top point as they curve up and around the bulk of wood.

After some study an improved arrangement of the three pieces was determined. This is seen from two directions in the two photos below, originally taken to remind me of the arrangement.


Sanding this sculpture was not something I was looking forward to. Running sandpaper over all of the planes and keeping it moving with the grain looked to be a real challenge, especially in the tight places, not to mention minimizing roundover of edges. Chris taught us all a new way to sand by hand, perfect for curved surfaces. A sheet of sandpaper, optionally covered on the back with a layer of packing tape, is cut into approximately 1" strips. The sandpaper is placed over the area to be sanded and the thumb is held tightly over the sandpaper in one spot. The sandpaper is pulled from under the thumb in the direction of the wood grain. One or two passes of the sandpaper over a spot in this fashion and it is sanded! Quick and easy and can be performed in tight spaces. No back and forth action is needed, just thumb press and pull! The photo below shows one plane of the void sanded successively with 220, 400, 600, and 1500 grit sandpaper. It was then treated with oil to highlight any scratches missed in the sanding. Incredibly smooth!

With Chris's help we began the process of pinning the three pieces of wood together. The parts were held in place and drilled with a 1/8" drill bit. Brass rods will eventually be used to hold the pieces together. We used some handy steel rod and drill bits. This pinning is shown below. The pinning was required at this point so the modifications on the two pieces of mesquite and on the knuckle of the juniper could be sketched out.


I won't go into more detail, but significant time was spent on all three parts of the sculpture to produce flowing lines and planes. Most of the planes have been sanded to 400 grit. A few shots of the sculpture held together with pins and hands reside below. This was the state of the sculpture at the end of the class.


Two things used during class, borrowed from Chris, were found to be very handy. The first was a sanding stick for rough sanding, essentially two paint stirrers glued back to back with a foam handle. Putting velcro around three sides of this sanding tool meant that velcro backed sandpaper could easily be affixed and changed. The second item of note was the open mesh "sandpaper". This stuff is outstanding, lasting forever and easily cleaned with a few raps on the bench.


Forgot to mention the granite base to which the statue will be mounted, maybe even with a bearing so the sculpture can rotate. MASW supplied the slabs of granite free of charge! The slab chosen is shown below. Some effort was made to soften the straight edges of the slab using a cold chisel. This granite is much harder than the others offered, nothing but small chips can be removed with the chisel.

Looking over the juniper this morning took me back to the questions above. Two questions resonated as I looked at it: where does it start and how do you make it more valuable. The grooves in the top of the piece all end in the same direction, moving toward the point, but their starting positions are somewhat random. The bottommost groove could easily be extended down, all the way to the bottom knuckle as there is already a depression in this area. The three photos attempt to show the groove's end and where it might be made longer.


I will try using the power tool for this as it can most easily get into the narrow groove already started by the tree, though the sawdust may be a challenge to contain. The trick is to not have to contain the sawdust! The patio became the workshop this morning. The post holding the power grinder was attached to a side table that matches our Adirondack loveseat. Sandbags to hold the juniper would have been nice, but need to purchase sand first, old jeans are always available.
The grinding went quickly with one groove now running from the top to the bottom and one groove extended only to meet another plane. The photos attempt to capture the changes. The only problem with the grinding was most of the sawdust wound up on me. Boy that grinder can fling the dust!


A number of planes were extended and refined on the central piece. This was followed by assembling the three parts and determining what work needed to be done on the mesquite. A significant chunk on the bottom of the long piece needed to be removed, so the bottom edge of the part would curve up nicely. A Japanese saw removed the bulk of the wood and was followed by a saw rasp for further quick removal. The regular rasp and then file finished the job. Multiple planes on both mesquite pieces were tackled. The pictures of the reassembled sculpture below show this progress.


The juniper has a 1/4" hole in the fist-like bottom end, visible in the second photo above. I don't have any juniper to match, so looked through my wood scraps and found a block of wood that might match. Grain needs to cross the end of the plug, so a dowel could not be used. A chunk of this wood was cut free of the scrap and machined in the lathe. It was reduced to 1/4", but with a slight taper of 2-3°. The plug was cut off, glue was dripped into the hole and the plug was set in with a mallet. The photos below show the process. The starting block of wood is seen in the second photo and shows what the sanded grain of the plug should resemble.


Two aspects of the mesquite sculpting were not quite right. The first photo below shows how a plane in the front piece needs to be rotated. This was done and the result is seen in the second photo.


The other piece of mesquite had an end that did not curve as much as I wanted, shown in the first photo below. Much of the end was removed with a saw rasp and a regular rasp shaped the rough result.


Sanding began after one final inspection and a few minor corrections on the juniper. The back of a sheet of 220 grit sandpaper was covered with packing tape. The sheet was cut into 1" X 8 1/2" strips. These were used to sand all cut surfaces of the mesquite parts. Two to three strips were needed for each. The sanding technique was the same as discussed above. The juniper was then sanded with the 220 grit strips. After a day of work all three parts are sanded to 400. Feeling really smooth!
This afternoon 600 grit sandpaper was used on all finished surfaces. After this sanding the dust was blown off and all three parts were carefully inspected for scratches. Multiple were found. These were sanded out, usually going back only to 220 grit, but a few deep scratches required 60 grit to remove them. These spots were then resanded up to 600 grit.
Finally, the 1500 grit sanding is complete. It all went well, but also revealed yet more rasp/file marks that needed to be removed. All in all about three hours for this final sanding. Since the reader can't feel just how glass-like these surfaces are, the photos below attempt to show the gloss left after sanding with 1500. Juniper and mesquite are very slow-growing trees, so the wood is quite dense and tough, both conducive to great finishes.


I almost forgot. There is one more step prior to applying a finish, the sanded surfaces are buffed with a piece of soft leather. This was undertaken and a few more scratches were located and sanded out. One spot was found that required significant work. Strips of wood were lifting up and silicone was filling a narrow deep gap. All repaired, sanded and buffed to a high sheen.
This morning the three pieces were examined one more time for extraneous scratches. A few were found and removed. The three pieces were then assembled with the temporary pins used so far, three pins. Two clamps were added so the pins could be removed one-by-one and replaced with the permanent pins.

The pin (black drill seen in the photo above) on the left was removed. A length of brass was inserted and marked. The brass rod was sawn off and the new end rounded with a file and sanded to a shine. The inserted end was marked with one dot to distinguish it from the next two pins.

The first pin was partially inserted and the second pin was made, the brass rod visible on the right two photos above. This pin had a circle Sharpied on its end. The last pin goes in from the side opposite the first two. It was also fashioned, end marked with a circle and a dot, and partially inserted. It is seen in the photo below. The pins won't be glued in place until the sculpture has had a finish applied.

To achieve a truly glasslike finish, Chris will use jeweler's rouge to polish the wood. The finish he uses is Birchwood Casey Gunstock Oil, available at the local Woodcrafters. Instead of the rouge 4000 grit sandpaper was ordered along with the Birchwood Casey gun stock oil and some Abranet sanding mesh.
It is now the last day of September and after some unavoidable delays it is past time to complete this sculpture. The sculpture and the two base pieces were sanded with the new 4000 grit sandpaper leaving a glass-like finish, seen below left. A few experiments will be undertaken with the gun stock oil. It should not be applied to bark and probably not to any unsanded areas. This was tested on some hidden spots for both the mesquite and juniper.


The test showed how black the bark gets after applying the gun stock oil as seen on the mesquite, bottom wood, above. The unsanded areas of the juniper after application have an unwanted glossy look and are now darker, though the oil is far from dry. Application will require care to avoid getting oil where it is not desired.
A small disposable paint brush was trimmed to remove stray bristles and to give it more of a rounded end. The gun stock oil was painted on both the juniper and the mesquite. There was very little absorption of the oil and it leaves a high gloss. The photo below shows the juniper after about an hour of dry time. Most is dry to the touch. The juniper is darkened more than expected. We will see what it looks like after another hour.

The paint brush was a bad idea. Too much oil was applied and the finish is thick and glossy. This first morning in October was spent with 0000 steel wool removing all of the gloss from all three parts. The parts now look much better, but need a final thin coat of oil.
Wiping the oil on with a blue shop towel while wearing gloves was the way to go. It was quick with just a thin film of oil added. After two hours of dry time the pieces look beautiful. A few small areas require a bit of sanding and re-oiling, but the finish is nearly complete.
Glue-up commenced this morning. A fourth set of holes for a pin were discovered (backside) and another pin was made. Two part epoxy was used to glue the pins into the holes. Clamps held things in place while the glue set. The five-minute epoxy set up almost too fast for my slow assembly. The photo below shows the statue with three pins in place. The fourth on the left needs to be shortened before gluing and was, finishing the assembly.

With the epoxy dried the sculpture is complete. The granite base still needs some work. The four photos below show the completed sculpture, maybe my first work of art since I was a child. I notice a few straight or almost straight lines in the piece, difficult to pick up until the piece is assembled and held in the right orientation.


The piece is so much nicer than I ever expected. Multiple carving iterations, while keeping Chris's questions in mind, made a huge difference to the final product. The granite base will be tackled in a separate write-up.